Passive infrared technology plays a crucial role in motion detection and automatic lighting systems. A passive infrared sensor detects changes in infrared radiation, making it an efficient and reliable component in electronics, security, and automation projects.
Whether you’re building a motion-activated light or an Arduino-based detection system, understanding passive infrared principles is essential for beginners and hobbyists alike.
In this article, you’ll learn what passive infrared is, how it works, and why it’s commonly used in motion sensing applications. We also walk through example projects using an Arduino Uno board and PIR sensor to help you put the theory into practice.

Table of Contents
- What Is Passive Infrared and How Does It Work?
- Components of a Passive Infrared Sensor
- Applications of Passive Infrared Technology
- Tips for Passive Infrared
- Common PIR Sensors for Arduino and Security Projects
- Using a Passive Infrared Motion Sensor with Arduino
- The Role of Fresnel Lenses in Passive Infrared Sensors
- Did You Know?
- Frequently Asked Questions (FAQ)
- What is the difference between active and passive infrared?
- Can a passive infrared motion sensor detect through walls?
- How far can a passive infrared detector sense motion?
- Can I use a passive infrared sensor outdoors?
- What is a passive infrared light?
- Why does my PIR security light trigger falsely, especially when it is windy?
- Conclusion
What Is Passive Infrared and How Does It Work?
Passive infrared (PIR) refers to a method of detecting motion using infrared radiation naturally emitted by all objects. Unlike active infrared systems, PIR systems do not emit energy; instead, they detect the IR radiation from moving heat sources—usually humans or animals.
A passive infrared sensor consists of a pyroelectric material that generates an electrical signal when infrared radiation changes. The sensor typically has a Fresnel lens to focus IR signals onto the sensing element and is calibrated to detect temperature variations in the human body range.
These sensors are widely used for:
- Security alarms and passive infrared movement detectors
- Passive infrared motion sensor lighting
- Home automation
- Arduino and microcontroller projects
The image below shows a solar security light that has a PIR sensor for motion detection. A solar panel at the top of the light charges the battery in the housing of the security light. In addition, the solar panel detects whether it is day or night.
When the ambient light level is low enough, the PIR sensor is activated to detect motion. When motion is detected, for example from someone walking near or under the light, the LED array switches on. The PIR sensor is behind the big round dome (the Fresnel lens) in the body of the light next to the LED array.

Components of a Passive Infrared Sensor
A typical passive infrared motion sensor module includes:
| Component | Description |
|---|---|
| Pyroelectric Sensor | Detects changes in IR radiation |
| Fresnel Lens | Focuses IR onto the sensor |
| Amplifier Circuit | Boosts the weak signal from the sensor |
| Comparator | Converts analog input into digital output |
| Delay/Trigger Control | Adjusts timing and sensitivity settings |
These sensors are generally compact, energy-efficient, and easy to integrate into electronic systems.
Applications of Passive Infrared Technology
Passive infrared detectors are used across various industries:
- Home Security Systems: Trigger alarms upon detecting movement.
- Automatic Lighting: Passive infrared lights in hallways, porches, or bathrooms.
- Industrial Automation: Monitor occupancy or machine safety zones.
- Consumer Electronics: Smart doorbells, pet monitoring, and gaming consoles.
Tips for Passive Infrared
- Avoid Heat Sources: Position your passive infrared sensor away from heaters, windows, or sunlight to prevent false triggers.
- Use Proper Delays: Adjust the delay and trigger time for optimal sensitivity and power usage.
- Test Angle and Range: Check the sensor’s datasheet for detection range and adjust the angle for maximum coverage.
- Shield from Drafts: Moving air can cause temperature fluctuations and interfere with infrared motion sensors.
- Use in Low Light: PIR sensors work well in darkness, making them ideal for nighttime applications.
Common PIR Sensors for Arduino and Security Projects
When working with Arduino passive infrared sensor projects, it’s helpful to understand the different types of PIR modules available. Two of the most beginner-friendly options are the SR602 and SR505, both compact and affordable sensors that work well for low-power, close-range motion detection.
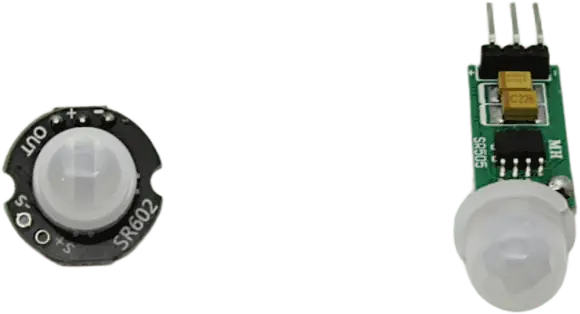
SR602 Mini PIR Sensor
The SR602 is a small, efficient PIR motion sensor ideal for battery-powered applications.
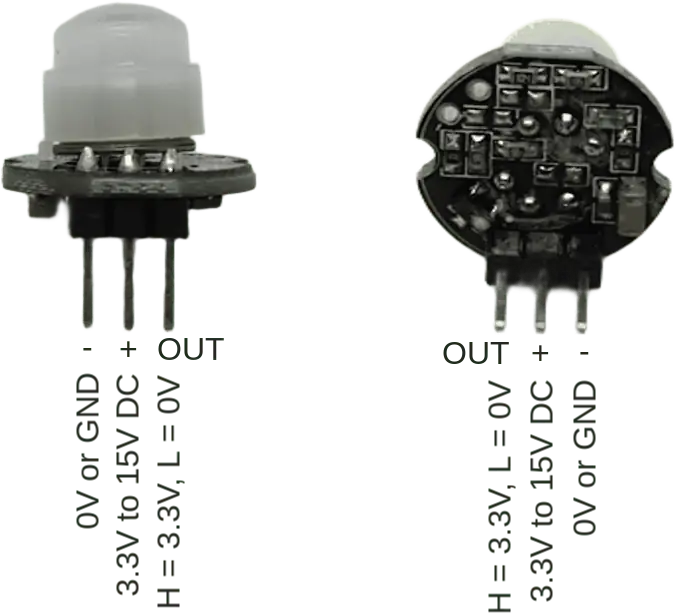
It operates on 3.3V to 15V DC and provides a digital HIGH signal (Output: high level, H=3.3V, L=0V) when motion is detected. Its compact form factor and low standby current make it ideal for portable or compact Arduino projects.
It has a detection range of about 0 to 5 meters (recommended distance: 0 – 3.5m) and a trigger time of approximately 2.5 seconds. The image of the SR602 sensor shows the pinout or pin numbering of this sensor.
SR505 Mini PIR Sensor
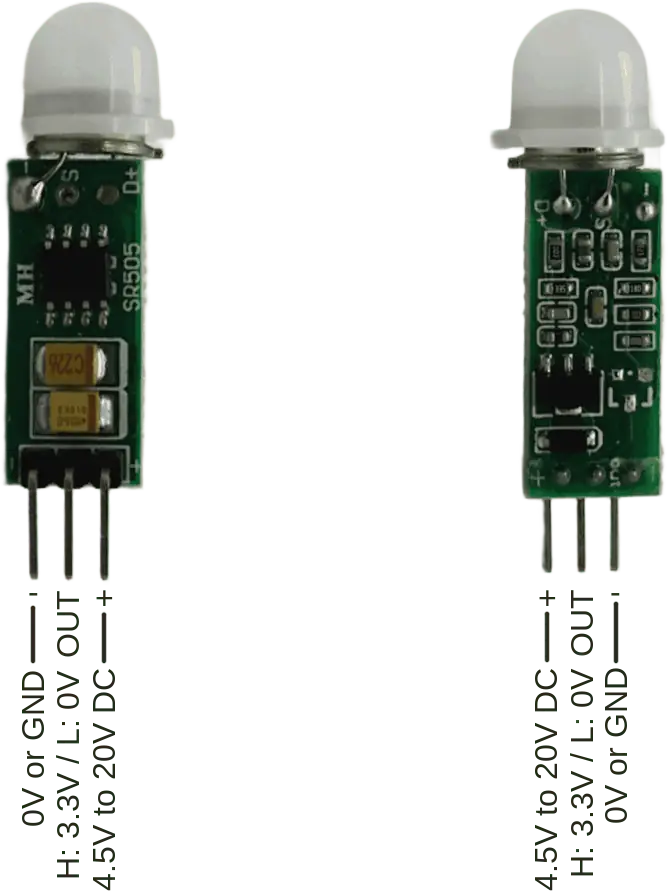
The SR505 runs on 4.5V to 20V DC.
It’s often used for simple motion-triggered LED or buzzer circuits.
It also outputs a HIGH signal (Output level: High 3.3V / Low 0V) when motion is sensed, and like the SR602, has no complex settings or tuning, making it great for quick builds or experimentation.
The image shows the pinout or pin numbering of the SR505 PIR sensor.
Larger 12V PIR Sensor with Adjustable Settings
For outdoor applications, you’ll often encounter the larger 12V PIR motion sensor commonly used in security lights. This sensor is typically enclosed in a weather-resistant plastic housing and includes three adjustable dials labeled SENS, TIME, and LUX on the underside:
- SENS adjusts detection sensitivity.
- TIME sets how long the output remains active after motion is detected.
- LUX controls the light level threshold for activation (e.g., only triggering at night).
These sensors usually have a ball-joint or similar hinge that allows the sensing head to be aimed, and a threaded shaft with a retaining nut for mounting to enclosures. For home projects, select a sensor that operates at low DC voltages, such as 12V DC, rather than those that operate from mains AC voltage. Mains voltage sensors of this type are also available, so be sure to check the specification when purchasing.

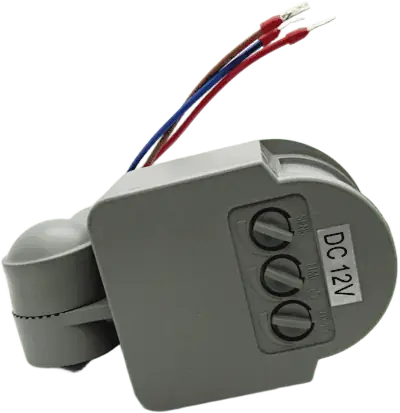
This variety of PIR sensors provides flexibility depending on whether you’re building small indoor projects or more rugged outdoor systems. There are many ways to connect this type of sensor to an Arduino board.
Bear in mind that the output from this sensor is +12V, so it can’t be connected directly to an Arduino digital pin. An easy way to connect this sensor to an Arduino board is to wire the sensor so that it drives the coil of a relay. The relay contacts can then be connected to the Arduino digital pin using a pull-up resistor. Other options to interface this sensor to an Arduino board are to use a transistor or opto-coupler.
Using a Passive Infrared Motion Sensor with Arduino
An Arduino passive infrared sensor setup is one of the most common beginner-friendly projects. It requires minimal wiring and basic coding to get started. What follows is the hardware, wiring and software needed to connect a PIR sensor to an Arduino and detect movement.
Parts Needed
Parts needed and suggestions for alternative parts follow. These parts are needed to connect a small passive infrared sensor to an Arduino board to see how it works.
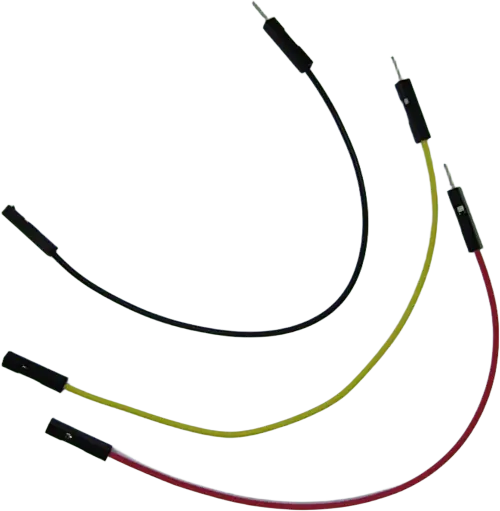
DuPont Jumper Wires
To use small PIR sensors like the SR602 and SR505, jumper wires (DuPont wires) that have one socket and one pin allow direct connection to an Arduino board. If you only have jumper wires that have a pin at each end, you will need to plug the sensor into an electronic breadboard. The following image shows the male to female DuPont wires used for direct connection of the sensor.
Passive Infrared Sensor (PIR)
One of the PIR sensors already mentioned and shown earlier in this article are needed. This can be an SR602 or SR505.
Arduino Board
An Arduino board such as an Arduino Uno R4 or Arduino Uno R3 can be used. An Arduino R4 board is used for this project and shown in the images that follow. It is easy enough to adapt this project to work with any other Arduino board.
Example Connection
Basic wiring from one of the small PIR sensors is as follows:
- VCC to Arduino 5V – this is marked with a plus sign (+) on the SR602 and SR505 sensor boards.
- GND to Arduino GND – this is marked with a minus sign (-) on the SR602 and SR505 sensor boards.
- OUT to Arduino digital pin (e.g., D2) – the SR602 and SR505 out pin.
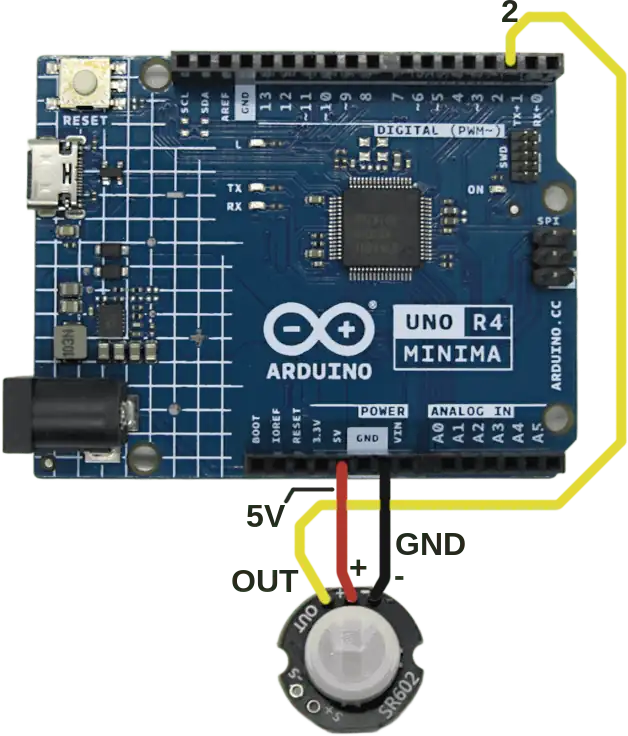
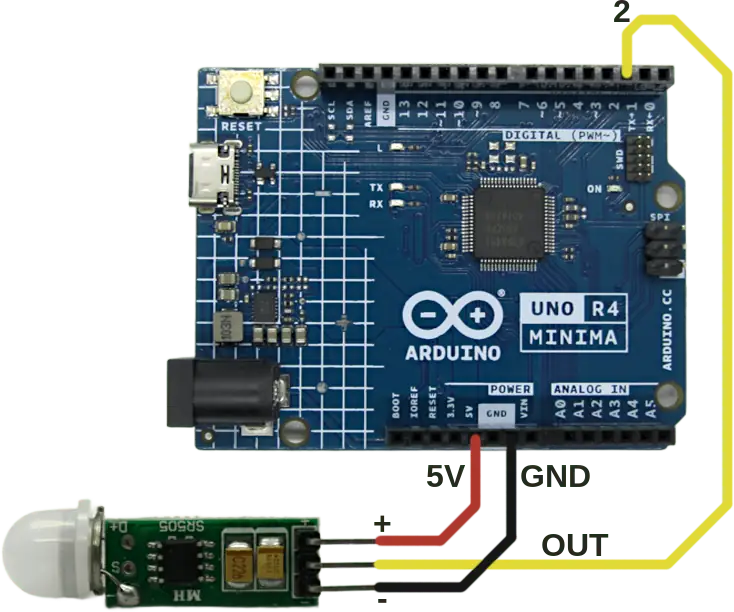
SR602 to Arduino Wiring
The following image shows wiring from an SR602 PIR sensor to an Arduino Uno R4 board. Use the same wiring for any version of an Arduino Uno board. As can be seen in the image, a red wire is used to connect +5V to the (+) pin of the sensor. A black wire is used to connect GND to the minus (-) pin of the sensor. Finally, a yellow wire connects digital pin 2 of the Arduino to the OUT pin of the sensor.
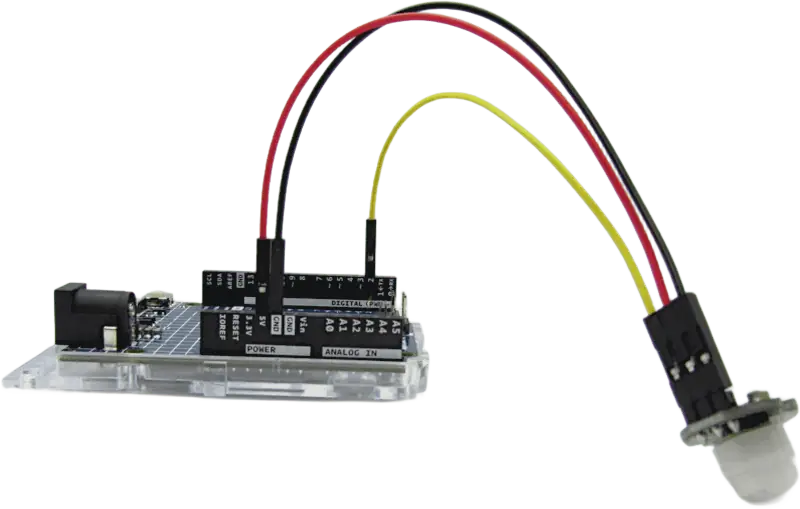
The following Arduino to SR602 wiring diagram gives a clearer view of the wiring.
SR505 to Arduino Wiring
The following image shows a SR505 sensor wired to an Arduino Uno R4 board. This wiring works for any Arduino Uno board version. A red wire is used for the sensor (+) to Arduino 5V connection. Black is used for the sensor (-) to Arduino GND connection. Finally a yellow wire is used for the sensor OUT to Arduino digital pin 2 connection.
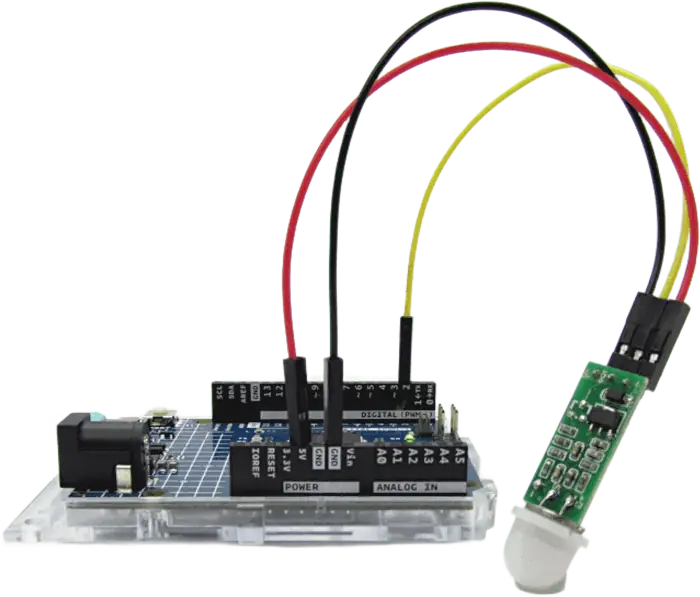
The following Arduino to SR505 wiring diagram gives a clearer view of the wiring.
Sample Code
Use the following sample Arduino code or sketch with any of the sensors that are shown in this article. Comments in the code explain how it works. An explanation of the code follows as well.
int pirPin = 2;             // Pin to use for PIR sensor
int ledPin = LED_BUILTIN;   // On-board LED to light up when motion detected

void setup() {
  pinMode(pirPin, INPUT);   // Set PIR pin as an input
  pinMode(ledPin, OUTPUT);  // Set LED pin as an output
  Serial.begin(9600);       // Serial USB for sending messages when motion detected
}

void loop() {
  int motion = digitalRead(pirPin);       // Read PIR OUT pin status

  if (motion == HIGH) {                   // Check if PIR detected motion
    digitalWrite(ledPin, HIGH);           // Motion was detected so turn LED on
    Serial.println("Motion Detected!");   // Send serial USB message
    while (digitalRead(pirPin) == HIGH);  // Wait until PIR OUT pin goes LOW
  }
  else {
    digitalWrite(ledPin, LOW);            // Motion was not detected by PIR so turn LED off
  }
  delay(200);                             // 200ms delay before checking PIR sensor again
}
How the Code Works
This basic code sets up digital pin 2 (D2) as an input pin to read the state of the PIR sensor. In addition it sets up the on-board LED pin of the Arduino board as an output. The idea is to read the state of the PIR sensor and switch the LED on if motion or movement is detected.
Change the Arduino pin number for the PIR sensor at the top of the sketch to use a pin other than pin 2 if desired. Change the LED pin to the desired digital pin if you want to use an external LED on a pin other than 2.
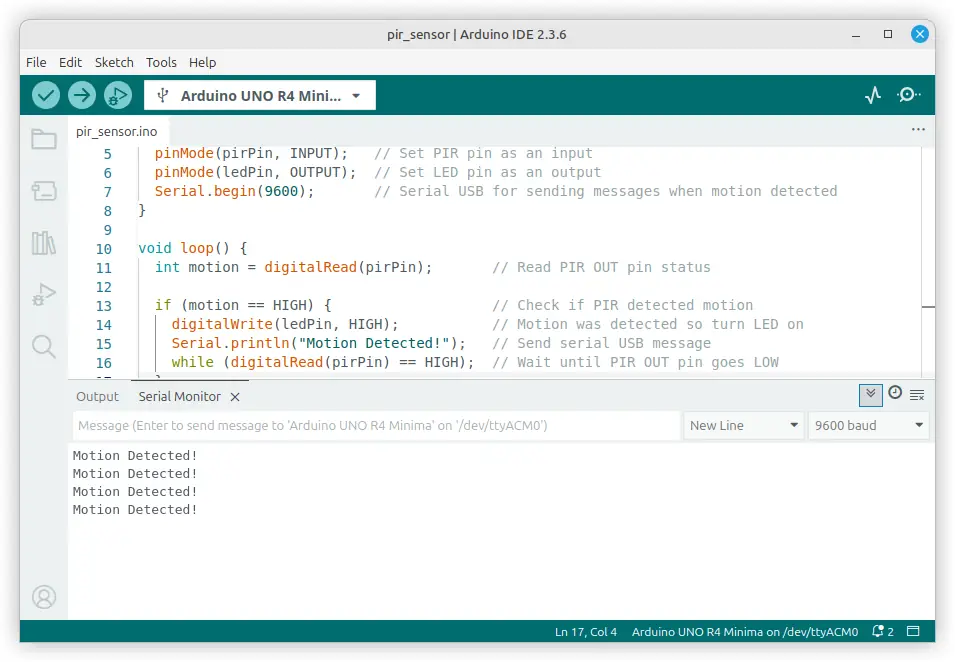
The serial USB port is set up to send a message over the serial USB connection when motion is detected. Connect to the Serial Monitor in the Arduino IDE to see this message.
In the loop() part of the sketch, the state of the PIR OUT pin is continually read. After reading the state of the PIR OUT pin, the sketch checks whether the OUT pin is at a HIGH state or not. If it is at a HIGH state, this means that motion was detected. In this case, the LED is switched on. In addition, a message is sent out of the serial USB port.
Finally, the sketch waits for the PIR sensor OUT pin to go LOW before doing anything else. This is the line of code: while (digitalRead(pirPin) == HIGH); which continually reads the PIR OUT pin until it changes from a HIGH state to LOW. It breaks out of this line of code only when a LOW state is detected.
If the PIR OUT pin is LOW, then the sketch simply switches the LED off.
Displaying the Output in the Serial Monitor Window
Click the magnifying glass icon in the top right corner of the Arduino IDE to open the serial monitor windows and see the output message from the Arduino sketch. Alternately select Tools –> Serial Monitor from the top menu in the Arduino IDE. The following image shows the Arduino IDE with output captured from the PIR sensor sketch when motion was detected.
The Role of Fresnel Lenses in Passive Infrared Sensors
A critical component that enhances the effectiveness of a passive infrared sensor is the Fresnel lens. This specially shaped optical lens focuses infrared radiation from multiple directions onto the sensor’s pyroelectric element, expanding both sensitivity and range.
Why Fresnel Lenses Are Used
A Fresnel lens uses concentric grooves to bend and direct infrared light. In PIR sensors, this lens is typically molded into a curved or dome-shaped cover, which segments the field of view into zones. As a warm object moves across these zones, the sensor detects changes in infrared radiation.
Benefits of Fresnel Lenses in PIR Sensors
- Wide Detection Area: The curved dome shape gives the passive infrared detector a broad field of view.
- Segmented Zones: Creates alternating bands of sensitivity that improve motion detection accuracy.
- Compact and Lightweight: Offers the benefits of a large lens in a small, efficient form.
How It Works
As a person moves through the sensor’s range, their body heat passes through different zones of the Fresnel lens. This causes rapid changes in infrared radiation on the pyroelectric element, which the infrared motion sensor registers as movement. The lens ensures these changes are focused and distinct, making the sensor more responsive and accurate.
Fresnel Lenses: From Lighthouses to Motion Sensors
Fresnel lenses were originally developed for lighthouses in the early 19th century by French physicist Augustin-Jean Fresnel. These lenses revolutionized maritime navigation by allowing lighthouses to project a powerful, focused beam of light visible over long distances, all while using a fraction of the material and weight of a traditional convex lens. By segmenting the lens into concentric rings, Fresnel was able to flatten and thin the design significantly without compromising its ability to bend and focus light efficiently.
This same optical principle eventually found its way into passive infrared (PIR) sensors. In modern PIR motion detectors, miniature Fresnel lenses are used to focus infrared radiation from multiple zones onto the sensor’s pyroelectric element. This design increases the detection range and creates multiple sensing zones, allowing the sensor to detect motion more accurately. While the Fresnel lenses in PIR sensors are far smaller and often made of plastic, the concept remains the same: efficiently bending light—in this case, infrared radiation—to a focal point for optimal performance.
The first image below shows a view from outside a lighthouse where the Fresnel lens can be seen through the window. The second image shows the Fresnel lens inside the lighthouse.


Did You Know?
- PIR technology was developed in the 1950s and is still widely used due to its simplicity and reliability.
- The term “passive” means the sensor doesn’t emit any energy; it simply receives infrared signals.
- Some passive infrared detectors can distinguish between humans and animals to reduce false alarms in security systems.
- Advanced versions use dual sensors to enhance accuracy and reduce interference.
Frequently Asked Questions (FAQ)
What is the difference between active and passive infrared?
Active infrared uses a transmitter and receiver to emit and detect IR beams, while passive infrared only detects IR radiation emitted by objects, making it simpler and more energy-efficient.
Can a passive infrared motion sensor detect through walls?
No, PIR sensors cannot see through walls or solid objects. They detect IR radiation changes in open spaces.
How far can a passive infrared detector sense motion?
Most PIR sensors have a detection range of 5 to 12 meters, depending on the model and environment.
Can I use a passive infrared sensor outdoors?
Yes, but choose weatherproof models specifically designed for outdoor use, and install them in sheltered areas.
What is a passive infrared light?
A passive infrared light refers to a lighting system activated by a PIR sensor, turning on when motion is detected and turning off after a set delay.
Why does my PIR security light trigger falsely, especially when it is windy?
False triggers in passive infrared motion sensors during windy conditions are often caused by movement of warm objects, such as swaying branches, pets, or even heated air currents. The sensor detects changes in infrared radiation, and if warm air or reflective surfaces move across its field of view, it can mistake them for human motion. Adjusting the sensor’s angle, reducing sensitivity, or narrowing its detection zone with masking tape or physical barriers can help minimize false alarms.
Conclusion
Passive infrared sensors are a foundational component in modern electronics, enabling motion detection in everything from home security to microcontroller projects. With a low cost, ease of use, and high reliability, PIR sensors are a great starting point for beginners exploring automation or sensing technologies. Whether you’re building a passive infrared motion sensor system or experimenting with an Arduino passive infrared sensor, mastering this technology opens the door to many innovative projects.
For more Arduino, microcontroller and programming articles, see our Microcontrollers & Programming category.